Take a look at the video below:
Now look at this one:
Both of these time-lapse sequences are by UK photographer Neil Bromhall. These types of time-lapse photos take a huge time commitment – weeks and months. This one, from Norway, took a full year.
In order to get the correct effect, the camera must remain in place throughout the video. Unless you’ve developed some miraculous method for placing the camera in the exact same spot each time with the exact same zoom and focus, the image will jump around and not look right. That means that you’re going to have leave your camera there, probably outside, exposed to weather, and not very secure.
I’ve got several cameras and smart phones capable of time-lapse photography. While I don’t mind leaving them out for a couple of hours, I can’t see tying them up for long-term projects. This is where the Raspberry Pi comes in.
First, though, let’s do some math…
It helps to know how long the time-lapse will last, or at least how many seconds of video you need. That will help determine the interval. In the case of the Norway video, we know that length – one year. If you were to take one shot each day at the same time, that would be 365 shots. Using a standard 30 frames per second, that would be 365/30, which would give you a fraction over 12 seconds worth of video.
The flower videos are a bit different. We need to calculate how long we want the video to last, and how many frames (shots) we would need. This determines interval. A flower blooming might take about three weeks – make it 21 days. If you want 10 seconds worth of video, that would be 10 X 30, or 300 frames. 21 days would be 504 hours, or 30,240 minutes. Divide that by 300, and you would need to take a shot a little over every 100 minutes. Let’s just make it one shot every hour and a half to make it nice and even.
In the case of the year-long time-lapse with daily shots you would want to take the photo at the same time every day, otherwise you get variations in light. With the shorter timeline you run the risk of taking shots when the sun has gone down. The options would be to provide constant lighting for the subject, or just use the photos taken during daylight. That would cut your number of shots roughly in half. To make up your 10 seconds of video, it would be better to take a shot every 45 minutes.
As for the Raspberry…
I downloaded and installed the Motion program. Motion is a program that actually does lots of things. It lets you monitor an area using a webcam. The cam senses motion, and only records an image when it detects movement. The images can be monitored from a web browser on another computer, even remotely if you have configured your router to allow it. It can be configured to run as a daemon in background mode so you can continue to use your RPi for other things. There is also a setting for interval shots, which is what you need for time-lapse.
Installing the program was as simple as typing the following command:
sudo apt-get install motion
That automatically downloads and installs the program. From there I had to modify the motion.conf file with the parameters I needed. This is done with the following command:
sudo nano /etc/motion/motion.conf
Rather than list the setting changes here, I’ll just refer you to the resource I used. These instructions for setting up a solar-powered surveillance camera, but the concepts are the same.
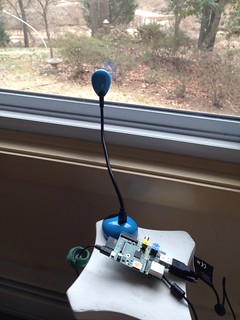
A couple of summers ago I gave several presentations at the Upstate Technology Conference. I was presented a HUE webcam for participating (actually won it as a door prize.) Many teachers are using these as inexpensive document cameras. I saw it as a perfect camera to use with the RPi.
I made the necessary setting changes in the motion.conf file and plugged in the camera. I fired up the Motion program using the following:
sudo services motion start
It worked. I was able to access the RPi remotely by typing its IP address into the browser on my laptop. When I had it set for motion sensing, it would write a JPG file to the SD card in the RPi when it detected motion.
I reset the motion.conf settings with a 30 second interval and decided to try some time-lapse. I could still monitor the images through the browser, but now it was writing a JPG regardless of whether or not there was motion. I set up the camera looking out the window before the snow started falling last week.
I let it run for just under three hours and got 328 images. Since I was powering the RPi from an old phone AC adapter, I didn’t have to change batteries, and it didn’t tie up one of my cameras. I used Adobe Premiere to combine the images into a time-lapse at 30 fps. Here’s the result.
OK, so the resolution is not great. It turns out that the HUE is best suited for close up items, such as flowers, rather than landscape or external views. Laura has some bulbs coming up, so I’ll have to give those a try. The next step is for me to construct some sort of weatherproof housing for the RPi and camera. I’ll have to worry about lighting at some point.
So, more experiments for the Rapsberry Pi. So far it’s doing what I want. I haven’t been brave enough to get into motor controllers, etc., but I might do that at some point.
One thought on “Time Lapse with Raspberry Pi”