Before Christmas I got an Amazon gift card for my birthday, and I used it to buy a MaKey MaKey. It arrived just before the hectic Christmas rush and our traveling, so I didn’t really get a chance to play with it. These past few very cold days have been the perfect opportunity to see what this thing can do.
So, what is this thing?
A MaKey MaKey is an Arduino-based computer interface that allows any conductive material to be substituted for a key on the computer keyboard. The name is a contraction of “Make Anything a Key,” or “MaKey.”
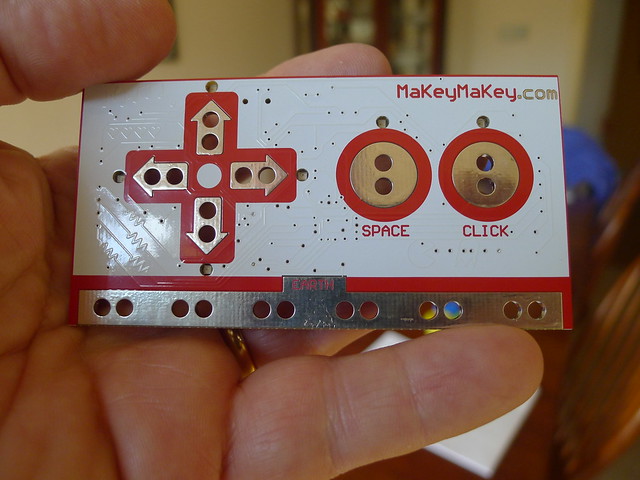
The kit comes with alligator clips and jumper wires to attach to…just about anything. The board is connected to the computer via USB. You connect the clip to some conductive material such as aluminum foil, liquid, or even a piece of fruit. Another clip is attached to the ground on the board, the held in one hand. Touching the fruit-foil-liquid will complete the circuit through your body and trigger the key, depending on where the first clip is attached on the board.
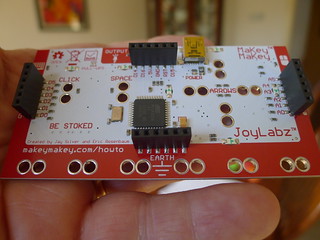
The front of the board has directional key connections and connections for space bar and mouse click. The back of the board has breadboard pin connections for letter keys on the left side, mouse movement on the right, and Arduino and USB connections at the top. All of these can be reconfigured and reassigned through the Arduino programming language. Ground (aka “Earth”) connections run along the bottom of both sides.
MaKey Makey was designed by Jay Silver and Eric Rosenbaum, two graduate MIT students who seem like two of the coolest dudes on the planet. Reading about their various projects and papers has inspired me to jump back into instructional technology, but going in an entirely different direction. Their work brings out the creative side of technology – an amalgam of inquisitiveness, music, art, exploration, and invention.
Silver and Rosenbaum designed the MaKey MaKey prototype based on a simplified Arduino circuit. Their project was funded via Kickstarter in 2012. Here’s a short promo video from Silver and Rosenbaum that shows off its capabilities.
Seems like everyone wants to make banana keyboards out of these things for some reason. Here’s a video of someone using various edibles to perform the Star Spangle Banner:
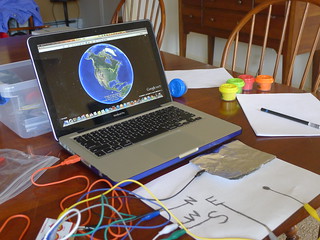
When I got mine I decided to forgo the gastronomic compositions. As soon as I saw the cursor arrows on the top side of the Makey Makey, my first thought was Google Earth. The second thing I spotted was the flower arrangement on our dining room table. Before Laura could get home to object, I had connected the various clips to the stems a lovely collection of Chrysanthemums. It worked beautifully, to a point. I couldn’t make Google Earth move by touching the flowers, but I could make it work by touching the stems just above the clip placement. I guess flowers aren’t as conductive as I might have hoped. Alas, I have no photos or video of that early experiment.
Fast forward past Christmas gatherings and a Bahamas cruise…
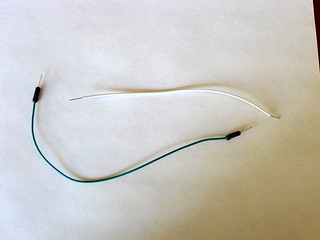
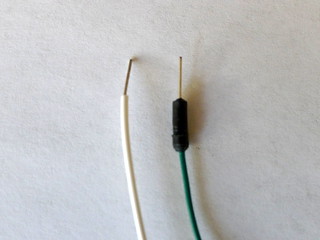
I decided that I needed more materials. First off, it seemed that the alligator clips and jumper cables that come with the kit, while adequate for most experimentation, were insufficient for my evil plans. There were not enough to create a musical keyboard with a full octave, so any banana piano I made would be limited. I ordered more alligator clips from Amazon. I also ordered a 100 piece pack of breadboard jumper cables. These have reinforced ends and come in a variety of lengths. You can see the difference between the supplied cables (white) and my replacement cables in the images below:
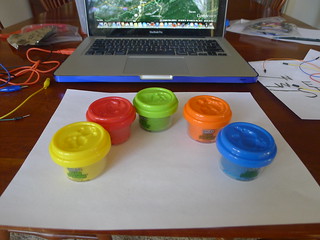
I also needed different conductive material for my initial tests. I went to Michael’s Crafts and picked up some off-brand PlayDoh™ (actually, RoseArt™ modelling clay) for $1. I also bought a soft graphite art pencil (much darker than the standard Number 2 test taker) for a couple of bucks.

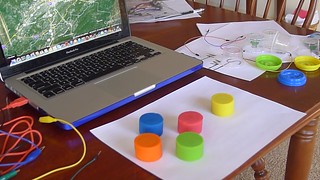
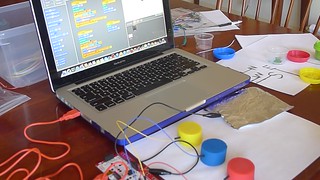
My first test was with the graphite pencil as a controller. I drew the letters N-E-S-W on the left side of a standard piece of printer paper, then drew heavy dark lines connecting the letters out to the edges where I would attach the alligator clips. I drew a single heavy dot on the right side to trigger a mouse click. This would allow me to zoom in with a click. There is a way to get it to zoom out, but for now I was keeping it simple. I connected the ground to a large piece of aluminum foil where I could simply rest my hand to complete the circuit.
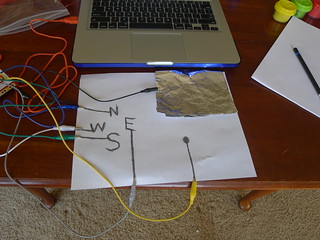
I had to tweak a couple of things to get it to work correctly. If the connection didn’t work at first, I would have to go back and redraw the lines darker. Eventually, though, I got it to work the way it was supposed to. Here’s a short video demonstration:
The next step was to see if I could do the same thing with the fake PlayDoh™. It’s my understanding that the dough is only conductive while it’s somewhat wet and pliable. Once it dries out, it won’t work. So, any controllers that you create with dough are temporary.
I decided to leave the dough in the cylindrical shapes straight from their containers. I placed four on the left side of another piece of paper for N-E-S-W, and one of the right for the mouse click. This time instead of alligator clips I pushed the end of a breadboard connector into the clay.
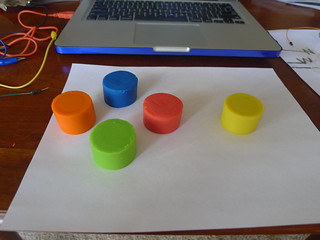
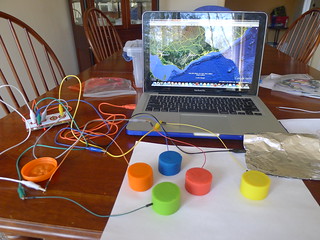
This one worked perfectly right off the bat. I didn’t have to tweak anything, as with the graphite lines. Here’s a video of the process:
That was a good start. It’s clear that I could extend the controls by connecting more points on the Makey Makey. I would be able to move the mouse and zoom in and out. It would be easy to create the directional letters using the dough for the control surface. However, as a proof of concept, this worked quite nicely.
So, what’s next?
The Scratch programming language from MIT is a perfect match for Makey Makey. The language is a graphic interpretation of the old LOGO programming language, which I used with students decades ago. Different scripts and actions can be initiated by pressing assigned keys, which can be re-assigned to the Makey Makey.
I wrote several simple scripts to test the interface. First up was a simple routine to draw a series of blue triangles when a key is press, then a series of red triangles when another key is pressed.
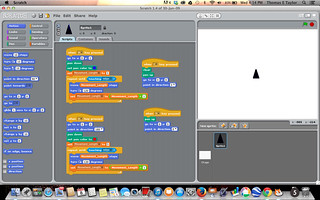
It makes sense that I should set it up so that when you touch the blue dough it draws the blue triangles, and when you touch the red dough it draws the red triangles. The yellow dough is for reset.
It worked as expected. Here’s video proof:
Obviously there is much, much more that can be done here. One of the first things that comes to mind is that it would be very easy to create innovative interfaces for special needs students, giving a whole new dimension to assistive technology.
I’ve been collecting more ideas for the Makey Makey and I’ll explore these at some point. There are lots of online games that could use neat controllers. I may do a separate blog post on those.
I did make a couple of other dangerous discoveries in my searching, though. First off is Sparkfun, the company that partnered with Sliver and Rosenbaum to produce the Makey Makeys. Not only do they sell these, but other Arduino components, Raspberry Pi’s, and other electronic components. The other is Adafruit, which sells similar products. I could spend a fortune at either of these sites.
Would love to do this with my students. For a newbie, what advice would you give on what hardware to buy? Could you help with instructions for the programming part?