I’ve been interested in these little gizmos for some time now. The Eye-Fi Explore is an SD card that will automagically upload your photos to your online photo service of choice whenever it comes within range of an open wireless network. Not only that, it uses some strange alchemy to geotag your photos each time you click the shutter. It sounded like the perfect photographic tool, but also the promises seemed too good to be true. I was hesitant to make the investment until I saw that Woot.com had one for a dirt-cheap price. I decided to give it a shot. I found it both to be about as amazing as I expected, and about as frustrating as I imagined.
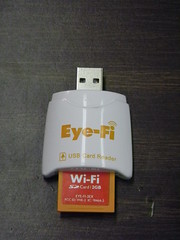
 The Eye-Fi comes with the SD card (2 GB in my case, but available up to 8 GB) and a USB card reader, as shown above. The management software comes on the card itself, and automatically launches when the device is first plugged into the computer. The first thing I discovered is that you must have wireless access to configure the device. Just being connected to a computer with Internet access isn’t enough.
There are lots of parameters that can be set with the device. You can choose your photo hosting service (Flickr, in my case) and even set up separate routing for videos, so your photos may go to Flickr, but your videos to YouTube. You can set the device to connect and upload automatically to any wifi hotspot, or only when it comes within range of specified hotspots. I always like to edit my photos before they go public, so I set the privacy settings so that I would be the only one to see them on Flickr. You can also enable/disable geotagging.
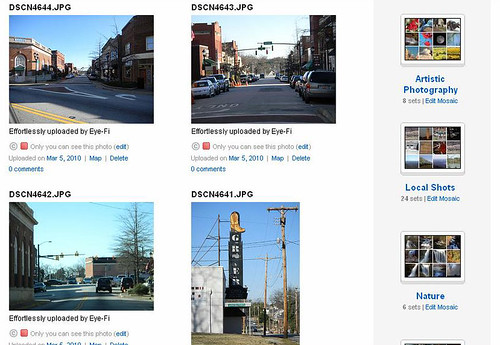
The most amazing thing is that this device actually works. I tried it in both my Fuji WP33 and my Nikon S70. It took photos, and when I turned the camera on in the presence of a wireless network, it uploaded the photos to my Flickr account without any interaction from me.
There were a few glitches, though. After successfully using the card in my Nikon S70, the Fuji WP33 wanted to format the card in order to save to it. I was hesitant, afraid that I would also mess up any other programming on the device. I put the card back into the Nikon and IT came up with a message saying that the card needed to be formatted. A quick check of the Eye-Fi support website indicated that it would be OK to format the card, but that I would lose the management software that comes pre-installed on the card. That could be downloaded again. I did that for both Mac and Windows just to be on the safe side, then formatted the card. I had no more formatting issues from either camera after that.
As for my Nikon D50 DSLR, I couldn’t get it to work at all in this older camera. Then again, I can’t get anything higher than 2 GB to work with this one. The website advertises that it will work well with newer Nikon DSLRs, and gives some specific settings for power management on the D60.
The performance of the device really depends on the speed of your network connection. If you have a strong WiFi signal and a fairly large pipe, the pictures will upload quickly. If you have a slower connection, it’s obviously going to take more time, and you’re going to run into some power issues for your camera. The device draws power from the camera, so there is a slight additional drain on the camera’s battery. However, you have to leave the camera turned on in order for the photos to upload. Most cameras have an auto-off setting. If your uploads are taking a long time, the auto-off might interfere with the process. If you can disable or reset the auto-off, that will help, but it also means that you will be depleting your camera’s battery in the process. The trade-off is between convenience and battery life.
By default all photos on the card are uploaded. The system keeps track of which have been added and which have not, so it doesn’t duplicate uploading. Supposedly there is a way to select which images are uploaded, but that seems to be dependent on the camera used, and I haven’t figured out the setting for either my Fuji or my Nikon. The ability to select rather than use an all-or-nothing approach would certainly improve battery life.
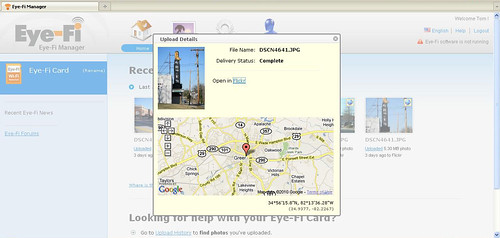
Geotagging is a strange proposition with this device. It doesn’t have a built-in GPS, but uses some triangulation algorithm from known WiFi hotspots – basically the same process that first-generation iPhones used for geotagging. It works – mostly. Again, the fact that it works at all astounds me. The device tagged the image accurately while at my office and where I had strong WiFi signals. It didn’t work as well when I snapped a couple of random shots on my way home. The accuracy was usually off by a couple of blocks. If no Wifi signal was present, it tagged the photo with the last known location, which could be miles away. Geotagging works best in city or populated areas where you have a high WiFi density. I’m not so sure it would work while hiking or kayaking in the backwoods.
Inaccuracy isn’t as much of a problem for me. I can make adjustments, and have had to do so even when using a handheld GPS or photo tracker. A bigger frustration is that the location data isn’t written directly to EXIF until AFTER the files are uploaded through the Eye-Fi servers. I tried to copy the files directly from the card into Picassa on both my Windows laptop and my Mac. In both cases the location data wasn’t recognized on the photos. This means that I can’t take advantage of the device’s geotagging capabilities unless I also go through the automatic upload process, which can be a problem.
Finally, the SD card can be read either by the included reader or any standard SD card reader that you might have with your computer. If you do have the USB card reader, you can wirelessly transfer your photos to your computer. However, this doesn’t make much sense because you still have to have a wireless connection, and it still doesn’t geotag the photos. I understand that the newest Eye-Fi card will allow for ad hoc wireless connections so that an Internet connection isn’t required. I still don’t think it will geotag to the desktop, though.
Conclusions:
Despite any complaints above, this is still one really cool little device. I’m still astounded that so much technology can be packed into such a tiny package. Even so, the cool factor is more of a driving force than any actual convenience. The process is much too slow on my home network and kills my camera battery, especially when I try to upload full-sized multi-megapixel images. It’s easier for me to just pop the card into my computer and copy the files like any standard SD card. However, you lose any geotagging by doing it that way.
The Eye-Fi would be most handy while traveling, especially if (A) you’re going to be an an Urban area with easy access to WiFi and (B) you won’t have access to a computer. Eventually you would have to log onto your photo service and change the photos from private to public. The alternative would be to make everything public from the start, but that might have some embarrassing consequences.
The card I got was only 2 GB. I usually keep an 8 GB card in both my Nikon and my Fuji. That’s probably overkill, but it means that I wouldn’t have to upload my images just to clear off the card if I were traveling.
Unless some of the newer products from Eye-Fi overcome some of these inconveniences, I personally wouldn’t buy one at regular retail. If you really must have one, wait until you get lucky, like I did, with Woot or try to find one on eBay.


How does the little SD card transmit to a WiFi receiver? I think I missed something . . . Doesn’t it need to transmit some radio frequency or something? Maybe I don’t understand WiFi . . .
There’s a tiny WiFi transceiver built into the SD card itself. It uses the power from the camera.