
Nope, not what you’re thinking. If you came here looking for something else, I’m afraid you will be disappointed. This will be a dull-by-comparison tutorial on Photoshop. In this case BOOB stands for Bridge Out Of Bounds, and Bezier curves are the cool masking technique I’ve finally mastered to make intricate OOB (Out Of Bounds) images possible.
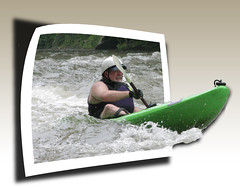
In an OOB, the image appears to break through a frame in the image. Imagine you have a framed photo hanging and part of that photo escaped onto the wall – that’s the effect that OOBs try to achieve. I’ve written about them before here, and there is a great Flickr discussion group dedicated to OOBs. Here is the first one that I ever attempted, where my kayak appears to leap out of the photo.
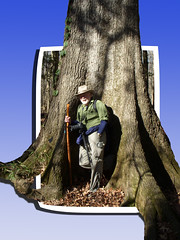
Now that I’ve got a fantastic photo editing setup with my Mac I wanted to try some more complex manipulation. So I started to play around with some of my old photos and turn them into OOBs. I started with a couple of simple OOBs first, just extending the photos beyond a frame.
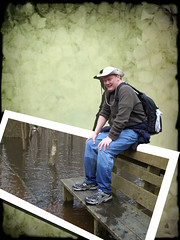
That second photo above was from our flooded Congaree trip back last Winter. We were forced to cross several logs, and that gave me the idea for another OOB…
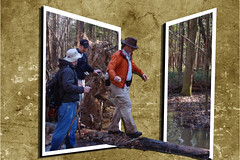
In this one two frames are used, with a connecting “bridge” between the frames. Hence the BOOB designation. I started looking at other bridge possibilities, such as the one at the top of this post.
Although the image below doesn’t span two frames, it is an OOB that includes a picture of a bridge, so I guess technically it’s a BOOB.
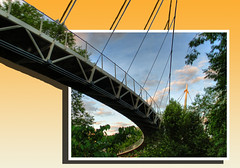
One thing I don’t like about this photo, though, is that the sky and plants are still visible through the railings on the part that extends out of the frame. I probably could have cleaned that up more with masking, but it seemed like a lot of effort. Also, I wasn’t happy with the rough editing of the underside of the bridge. By itself, this wasn’t a problem, but the drop shadow really highlights how jagged that edge is. I needed a new way to create these masks, and that’s where the curves come in.
A Bezier curve is created by the Photoshop Pen Tool. Photoshop calls the lines created by the pen tool “paths.” Paths give much greater control over selection of shapes, and allows for smoother lines and curves. Since I have finally just gotten the hang of curves I’m not going to attempt a tutorial, but rather will point to another excellent resource on the WebDesign.org website.
I was able to use the curves to get the nice arched bridge shape for the image at the top of the page. I also used them to create the OOB below, which had some tricky masking because of the rope attached to the bull…
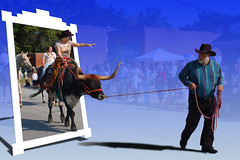
I guess since this has a bull in the image it’s still a BOOB – Bull Out Of Bounds.
As Donnie says in Episode #4 of “You Suck at Photoshop”, you’re probably using about $90 worth of Photoshop’s $600 price. Learning how to use curves properly will get you up to about $250. In my opinion, learning how to use masks will add about another $100 to that value.
thanks! I pretty much suck when it comes to masking and selecting in Photoshop. Pretty much used vector programs to do most of my serious graphics work, so I’m inspired to learn from what you’ve posted. The fact is, though, that a person could spend the rest of their life learning Photoshop, and still likely not max it out. Amazing how well implemented each version has been, and the multiplicity of approaches possible to a particular editing problem.