Source: amiria.co.nz via Tom on Pinterest
After posting my time-lapse video the other day I made several observations. First, it seems that anyone interested in learning time-lapse starts off by making a video of leaf-raking. There are TONS of them out there on YouTube. The most common soundtracks were Khachaturian’s “Sabre Dance” or Boots Randolph’s “Yakkety Sax.” Here I’ve made a short playlist that contains no less than 19 Youtube videos, all of time-lapse leaf raking.
Leaf raking/blowing obsession aside, here are some other observations I’ve made…
1. Video vs Images
Video is really just a series of moving images, or frames, so the “versus” implied in the above heading is false. However, there is a distinction in how certain apps and cameras treat time-lapse. Some capture a series of images using an intervalometer. Those images are single, stand-alone photographs, which then must be combined into a time-lapse video using another piece of software such as Lightroom or iMovie. Others capture the images in the same fashion, but software within the camera or the app automatically renders the video, which can be output as a .AVI, .MP4, or .MOV file.
If you capture a series of images before they are processed into a video there are more steps involved, but you’ve got much, much more control over the video. You can adjust the images for exposure and add other effects such as HDR (if you want). You also have greater control over frame rate and other video aspects.
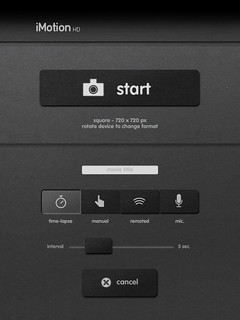
Apps that automatically create time-lapse are great for convenience. I’ve been using the iMotion app for iPad and iPhone. It’s the same app I used to create the time-lapse videos of Samish Island last year. You can usually set the interval on these apps, as seen in this screen capture from iMotion:
The downside is that you can’t control for exposure or frame rate. Here’s a video I shot of a sunrise from our back deck. There were cool shadows and lighting on the trees, as well as clouds rushing across the sky. None of this was captured in the video because the trees were too dark and the sky was washed out. Here’s that video…
It seems to me that these apps would work best where you have consistent lighting situations. Apart from that, they seem to work great. There are lots of other time-lapse apps available, but I haven’t had a chance to check out many of them (and I welcome suggestions from those that have.) I did download one called Miniatures that will do tilt-shift time-lapse. That looks like it will be fun to play with.
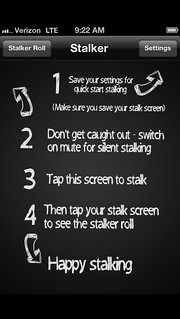
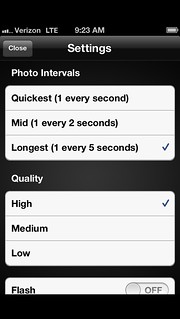
The post yesterday described how to create a manual time-lapse from a series of images. There are some apps that will let you do this on an iOS device. One of the most useful (and most unfortunately named) is the Stalker app. It’s original purpose was to take stealthy images on an iPhone, but one of the benefits is that you can set the app to take photos at an interval.
This makes it an excellent app for time-lapse. Once the images are captured they can be exported to iMovie on the iOS device for immediate processing, or they can be exported to to a computer for processing through Lightroom or some other application.
2. Go Manual
Let’s assume that you’ve decided to go with a higher end camera with an intervalometer and take a series of photos that you will later combine into a time-lapse video. You could put the camera into point-and-shoot automatic mode, but that could create some problems.
- Focus – Set for manual focus and focus on an area the will cover most of the action in the shot. If you have the camera set for auto-focus, the focus may shift from background to foreground if something or someone wanders in front of the camera. I discovered this in my leaf-raking video, but it’s not too noticeable. It might be worse in a crowd scene.
- Exposure – This is a bit trickier. If you’re shooting something with changing lighting conditions such as a sunrise or sunset, you might want to go with automatic settings. However, if the scene’s lighting is relatively stable, set for a single ISO setting, aperture, and shutter speed. I would suggest going slightly underexposed by about a half an f-stop and then make changes as needed in post-production. By doing this, if something wanders into the shot casting a strong shadow it won’t drastically change the lighting of the shot.
3. Go Small
One of the mistakes I made with my leaf-raking video is that I used the full 16 megabyte images for my video. The resulting images took up about 6 GB of space. High-Definition 1080p video is only 1920 × 1080, or 2.1 megapixels. You can reduce the file size and still get stunning videos. This will also reduce the amount of processing power required to render the video.
4. Go with the Less Obvious
As my leaf clearing explorations pointed out, there are some scenes that everyone does in time-lapse. Sunrise and sunset videos also get lots of attention. When I was doing my sunrise video I noticed that some of the best scenes didn’t involve pointing the camera directly at the sunrise. The changing shadows and highlighted treetops opposite from, or at an angle to sunrise were just as interesting. I may try one of these angles tomorrow morning.
5. Go with a Focal Point of Interest
Just as a photography with no point of interest is boring, and time-lapse video without a focal point can be just as boring. That focal point can involve movement or a static point of reference. However, a video that just shows change in lighting will be dull by itself.
And finally…
6. Be Patient
Time-lapse takes lots more time than you think it will. Even at 1 frame every five seconds, getting enough video takes quite awhile. For example, I stopped by sunrise video above too soon. If I had left it running I might have caught some of those interesting shadows and highlights as the lighting evened out. I can always clip the beginning and end of the video if necessary.
Those are just a few of my non-professional observations. I’m going to playing with lots more time-lapse and stop-motion video over the next month or so, and I’m sure I’ll make more discoveries, some of which might contradict what I’ve written above. We’ll see.
Diving photo at the start of this post by Ray Demski.


Just started playing around time lapse. Thanks for the article.