This past week Dad had been in the hospital to have his pacemaker replaced. Full of new energy, he wanted to get out and about when I came down for a visit on Friday. So, we loaded up the car with cameras and road out into the countryside around the town of Prosperity.
Our drive took us past places I had visited recently, so I narrated. I gave both Mom and Dad a point-n-shoot camera so they could take a few snaps along the way, too. We stopped at the new Palmetto Trail Bridge over the Broad River near Peak, drove past the Old Brick Church near Jenkinsville, drove through the Anderson Quarry area where they mine the Winnesboro Blue granite, then along the shores of Lake Monticello up to the little community of Monticello. It was a good ride.
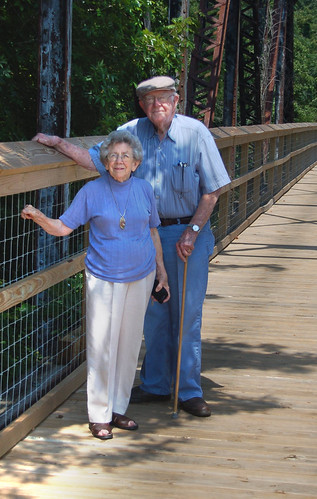
While at the Peak Bridge the parents posed for the portrait that you see at the top of this post. As I was processing the image, I thought it might be time for a quick Photoshop tutorial on adjusting exposure within a single shot.
The original image presented some problems. My parents were standing in a bit of shade since it was hot on the bridge, but there was bright sunshine everywhere else.
This created some shadows across the faces. If I tried to adjust the exposure for the faces the lighter portions might be washed out. Here are three quick techniques for fixing the problem…
The quickest Photoshop method is to simply select Image -> Adjust Image -> Shadow & Highlights. This works fairly well, but can create some unnatural tones in the image. It can also introduce some digital noise into the image where darker areas have been lightened.

You could also use a program like Photomatix or ReDynamics to create a pseudo-HDR image from the single shot. This works better if you’re shooting RAW, but if you have a camera that only shoots JPG, it can be more difficult.
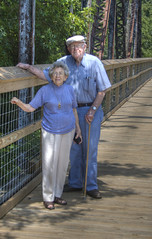
HDR software has improved since I’ve been working with it. The early versions tended to make the skin tones look orange. The example above was done from a RAW file in Photomatix, and the tones look good to me.
But what if you’ve only got JPG? Here’s probably the easiest method, and I’ll describe it in more detail. First, open the image in Photoshop. Press CTRL-A to select the entire image, the CTRL-V to paste the image into a new layer. Select the new layer and use Image -> Adjust -> Exposure to adjust the image so that the faces have the right exposure. Don’t worry about the rest of the picture – it can be washed out.
Next, create a mask on the new layer you just adjusted by clicking on the mask icon.
Then select the gradient tool from the tool set. With the mask selected, draw a line across the image, making sure starting from the lightest area and moving to the darkest. When you do this, your layer navigator should look like this…
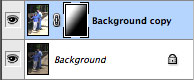
The mask fades the exposure from one layer to the next, so that the correctly adjusted faces are clear, and the correctly exposed portions from the original image come through. You may have to experiment drawing the gradient line until you get the best results, but it’s a quick way to adjust the image without having to use HDR or do anything else weird to the photo.
Tom, regardless of how you got it in that state (!), it turned out great, and I would love a printed copy, please. Could be Dad’s 85th portrait.
Next time you you are this close to Chapin, let me know and you and your parents can meet me at Farm Boys BBQ! Enjoyed being at the tweet up with you the other nite.
I was up at Lake Monticello on July 22. Did we pass on the highway? What day did you drive with your parents.
Great to see you this week.
Dwight
It was in the afternoon on Friday of last week.